
Use tools with agents
Tools extend agents in Visual Studio Code with specialized functionality for accomplishing specific tasks like searching code, running commands, fetching web content, or invoking APIs. VS Code supports three types of tools: built-in tools, Model Context Protocol (MCP) tools, and extension tools.
For background on tool types and how tools work in the agent loop, see Tools concepts.
This article shows how to complete a request with tools, direct the agent to specific tools, control which tools are available, and review tool calls.
Use tools in a request
By default, the agent chooses from the enabled tools based on your request and the current context. You don't need to name or select each tool before you start.
To complete a request with tools:
-
In the chat input, select Agent from the agent picker.
-
Enter a prompt that describes your goal and how the agent should verify its work. For example:
Find the cause of the failing tests in this project, fix it, and run the relevant tests to verify the change. -
Review each tool call as the agent works. If an approval prompt appears, expand the tool details to review its inputs, and then select Allow to run it.
-
Expand a tool summary in the conversation to inspect the call and its output. When the task is complete, review the agent's response, code changes, and validation results.
To control which calls require approval and how much autonomy the agent has, see Manage approvals and permissions.
Change how tool calls are grouped in chat
By default, tool call details are collapsed in the chat conversation. Use
chat.agent.thinking.collapsedTools
(experimental) to change the grouping behavior. Use off to keep tool calls separate, withThinking to group tools with thinking when available, or always to always group tools. When
chat.agent.thinkingStyle
is set to collapsed, reasoning and grouped tool calls can appear in separate collapsible sections.
Reference a tool explicitly
Type # in the chat input to reference a specific tool or tool set. Use an explicit reference when you want to direct the agent to a particular capability instead of letting it choose.
For example, use the #web/fetch tool to retrieve a specific web page:
Summarize the latest release notes at code.visualstudio.com/updates with #web/fetch.
Use a tool set, such as #web, to make a group of related tools available:
Research how Next.js handles routing. Use #web tools and summarize the relevant guidance.
The # menu also contains context items, such as files, folders, and editor selections. Context items provide information for the request, while tools give the agent capabilities to gather information or take actions. Learn more about adding context to chat prompts.
To group related tools and reuse them across prompts, prompt files, and custom agents, create a tool set.
Select tools for a request
The Local and Copilot harnesses use different controls to select client-side tools.
Select tools for an individual request from the Chat view:
-
In the chat input, select the Local harness and then select Agent from the agent picker.
-
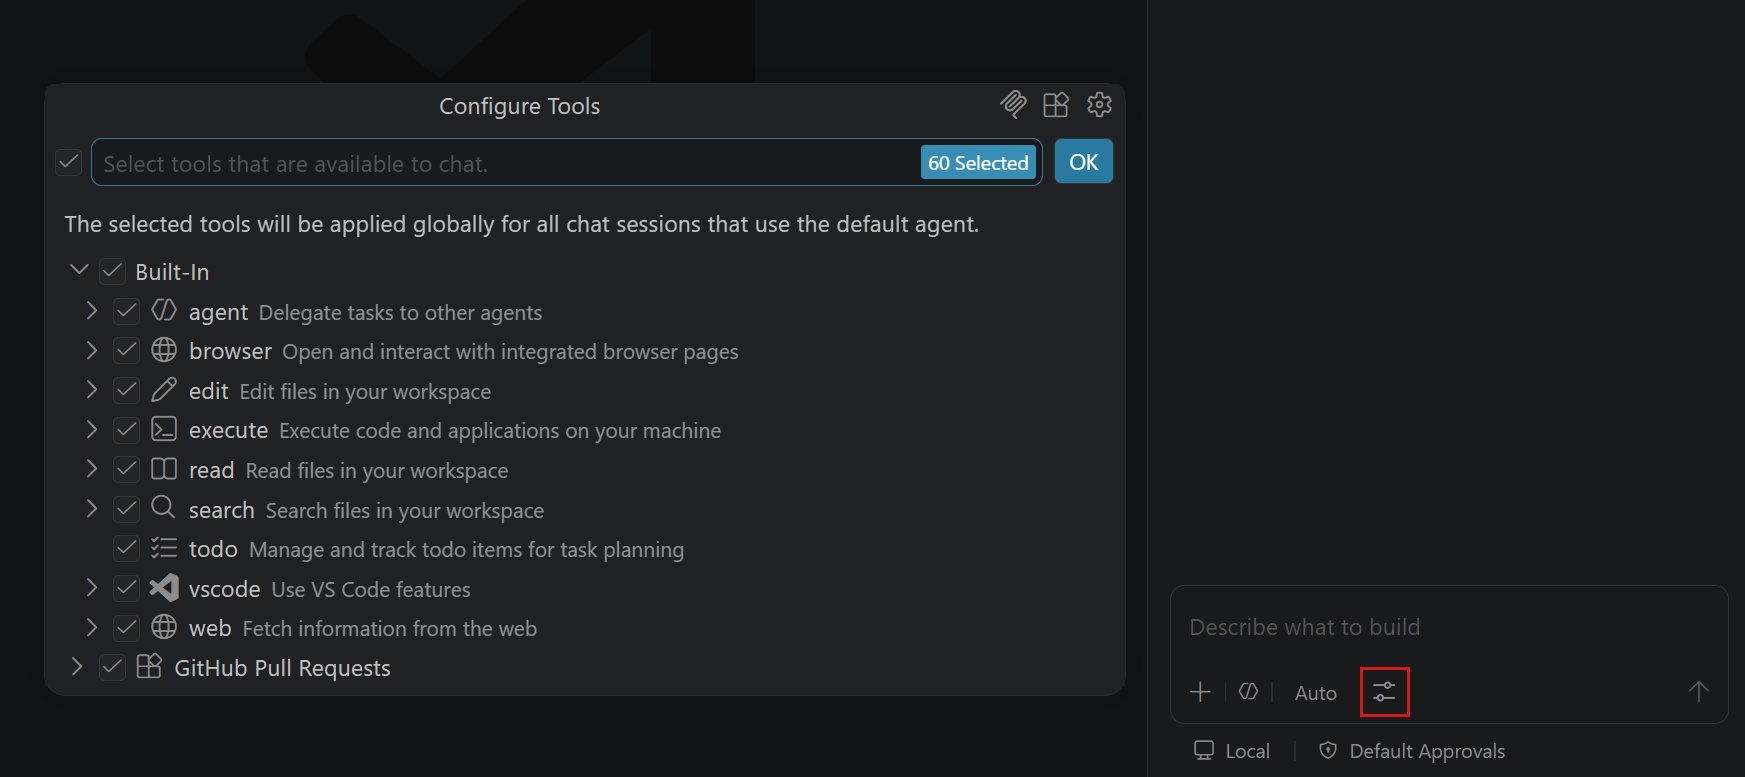
Select Configure Tools.
-
Select or deselect tools to control which ones are available for the current request. Use the search box to filter the list.
Manage tools for the Copilot harness from the Agent Customizations editor:
-
In the chat input, select the Copilot harness.
-
Open the Agent Customizations editor:
- In the Chat view, select Configure Chat (gear icon), or run Chat: Open Customizations from the Command Palette (⇧⌘P (Windows, Linux Ctrl+Shift+P)).
- In the Agents window, go to the Customizations panel.
-
Select the Tools tab.
-
Select or deselect tools to control which ones are available to the Copilot harness. These choices persist in the active user profile.
For either session type, limit the selection to tools that are relevant to your request. Add capabilities by installing MCP servers or extensions that contribute tools.
When you customize chat with prompt files or custom agents, you can specify which tools are available for a workflow. Learn more about the tool list priority order.
Manage tool availability for Copilot
All client-side tools are available to the Copilot harness by default. In the Tools tab, tools are organized into collapsible groups. You can:
- Enter text in the search box to filter tool groups and individual tools.
- Select a tool group checkbox to enable or disable every tool in the group.
- Expand a group and select individual tools. The group checkbox shows a mixed state when only some tools are enabled.
- Review the enabled and total tool counts shown for each group.
The count beside Tools in the customization navigation includes enabled client-side tools and excludes the read-only tools built into the Copilot harness.
The Copilot group lists the harness's built-in tools. These tools run in the Copilot runtime and are read-only in the Tools tab. Other tools run in the VS Code client and are available to the agent only while the client is connected.
Tool availability is separate from tool approval. Enabling a tool makes it available to the agent, but doesn't bypass the configured approval and permission controls.
Add extension tools for Copilot
In the main VS Code window, you can find extensions that contribute language model tools:
-
Open the Tools tab and select Browse Marketplace.
-
Search for an extension and select it to view its details and contributed tools.
-
Install the extension. Its tools then appear in the tool list, where you can manage their availability.
The Agents window shows the tool availability list but doesn't include Marketplace browsing.
To remove an extension from the tool list, right-click its tool group and select Uninstall Extension.
Uninstalling a tool extension removes the entire extension, including contributions that aren't tools.
Edit tool parameters
For a tool call that requires approval, you can review and edit its input parameters before it runs:
-
When the tool confirmation dialog appears, select the chevron next to the tool name to expand its details.
-
Edit any tool input parameters as needed.
-
Select Allow to run the tool with the modified parameters.
Common built-in tool workflows
Use browser tools
Browser tools give agents an interactive way to validate web applications. Instead of inspecting only the source code, an agent can run your app, open it in the integrated browser, exercise a user flow, inspect page content and console errors, and fix problems it discovers.
Browser tools are built into VS Code and don't require an external MCP server. Use them when a task has an observable result in a web interface, such as verifying a form, reproducing a visual bug, checking responsive behavior, or testing a complete user journey.
Start the app, open it in the browser, and test the password reset flow.
Fix any issues you find and repeat the flow to verify the fix.
Learn how to use browser tools with agents, including browser sessions, page sharing, privacy controls, and effective prompting patterns.
Run terminal commands
Of all the built-in tools, the terminal tool is one of the most frequently used. The agent uses it to run commands as part of its workflow, for example to install dependencies, run a build, or execute tests. Because terminal commands can change your environment, VS Code provides additional controls for reviewing, running, and monitoring them, building on the approval behavior described earlier.
When the agent decides to run a command, it uses the built-in terminal tool to execute it in an integrated terminal within VS Code.
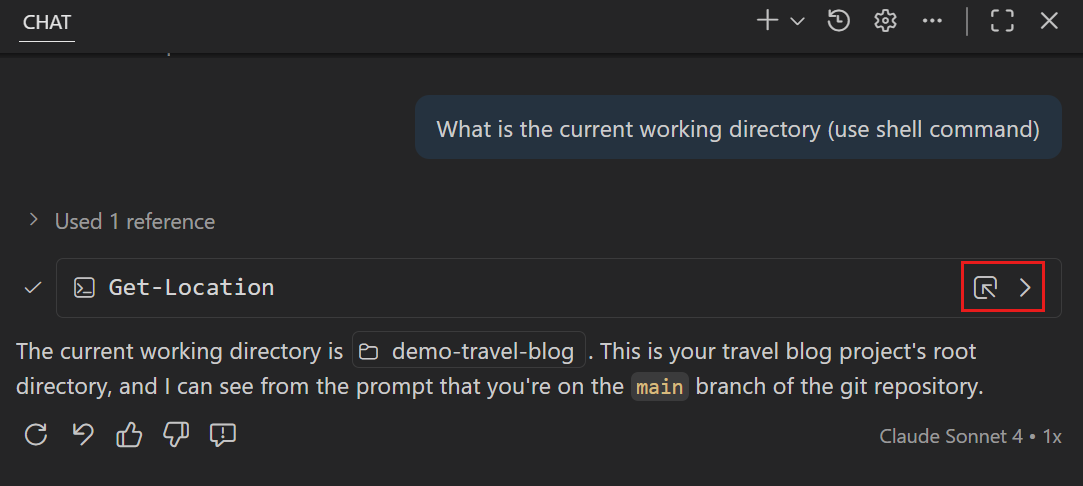
In the chat conversation, the agent displays the commands it ran. You can view the output of the command inline in chat by selecting Show Output (>) next to the command. You can also view the full output in the integrated terminal by selecting Show Terminal.
Change where terminal output appears
Use chat.tools.terminal.outputLocation (experimental) to show terminal command output inline in chat or directly in the integrated terminal.
Continue terminal commands in background
When the agent runs a long-running terminal command, such as starting a development server or running a build in watch mode, you can push the command to the background. This allows the agent to continue with other tasks without waiting for the command to finish.
While a command is running, a Continue in Background button appears next to the terminal command in the chat conversation. Select this button to move the command to the background. The command continues running, and the agent can check its output later or use the terminal for other tasks.
The agent can also specify a timeout when running terminal commands. When the timeout is reached, the agent stops waiting for the command and returns the output collected so far. Use the chat.tools.terminal.enforceTimeoutFromModel setting to control whether to enforce the timeout value that the agent specifies.
The agent can also choose to run commands directly in the background, without user interaction. Background terminals that you have not revealed are automatically cleaned up when their command finishes, which prevents stale terminals from accumulating over a long session. To reveal a background terminal and keep it open after the command completes, select the Show link in the chat tool invocation header. The terminal output remains visible in the chat conversation even after a terminal is cleaned up.
To automatically approve terminal commands or restrict file system and network access for agent commands, see Manage approvals and permissions.
Frequently asked questions
How do I know which tools are available?
Type # in the chat input field to browse available tools, tool sets, and context items. You can also use the tools picker in chat to view and manage the enabled tools.
For Copilot sessions, open the Agent Customizations editor and select the Tools tab to view and manage enabled tools.
I'm getting an error that says "Cannot have more than 128 tools per request."
A chat request can have a maximum of 128 tools enabled at a time. If you see an error about exceeding 128 tools per request:
-
Open the tools picker in the Chat view and deselect some tools or entire MCP servers to reduce the count.
-
Alternatively, enable virtual tools with the github.copilot.chat.virtualTools.threshold setting to automatically manage large tool sets.
Why isn't the agent using my configured terminal shell?
The agent uses the shell you have configured as the default for the terminal, except for cmd (Command Prompt) on Windows and sh on macOS/Linux. This is because shell integration is not supported with these shells, which means the agent has very limited visibility into what's going on inside the terminal. Instead of getting direct signals for when commands are being run or have finished running, the agent needs to rely on timeouts and watching for the terminal to idle to continue. This leads to a slow and flaky experience.
You can still configure the agent to use these shells with the terminal profile settings, however this will result in an inferior experience compared to using PowerShell on Windows or bash/zsh on macOS/Linux.
- chat.tools.terminal.terminalProfile.windows - Override the shell on Windows
- chat.tools.terminal.terminalProfile.osx - Override the shell on macOS
- chat.tools.terminal.terminalProfile.linux - Override the shell on Linux
Can I create my own tools?
Yes. You can create tools in two ways:
- Develop a VS Code extension that contributes tools using the Language Model Tools API
- Create an MCP server that provides tools. See the MCP developer guide